
 Yesterday was really chilly here in Fall River Mills so I spent the day stampin’ a bunch of these sweet and simple cards. Petal Palette is one of my favorites in the 2018 Stampin’ Up! Occasions Catalog. I designed this card as a make & take for my last class and promised to share the tutorial!
For a chance to receive one of these cards please LIKE my Facebook page Stampin’ Up! – Stampin’ With Kim and comment here. Winners will be chosen on March 27th.
Enjoy the tutorial!
Stamps:
Petal Palette Bundle – 145974
Petal Palette – 145788
Petals & More Thinlits Dies – 145655
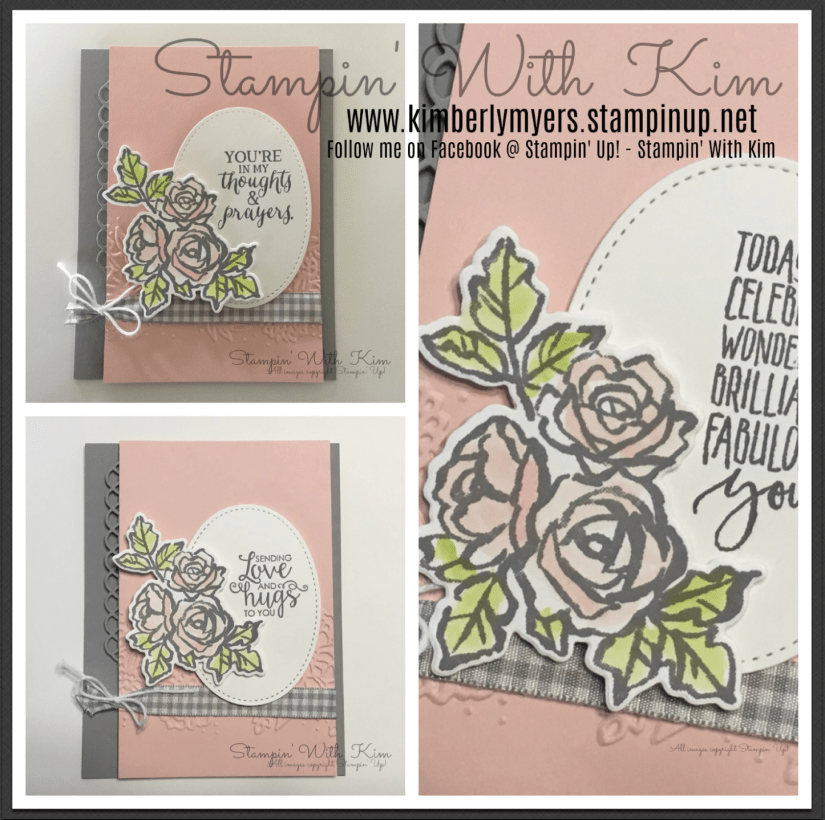
Rose Wonder – 140697 – You’re in thoughts and prayers.
Ribbon of Courage – 143885 – Sending love and hugs to you.
Picture Perfect Birthday – 145519 – Today we celebrate wonderful brilliant fabulous you!
Paper:
Powder Pink Cardstock – 144244
Smoky Slate Cardstock – Item #131202
Whisper White Cardstock – 100730
Ink:
Basic Gray – 140932
Powder Pink – 144084
Lemon Lime Twist – 144086
Accessories:
Stitched Shapes Framelits – 145372
Petal Pair Textured Impressions Embossing Folders – 145656
Aqua Painter – 103954
1/2″ Smoky Slate Gingham Ribbon – 144231
Whisper White Solid Baker’ Twine – 124262
Mini Stampin’ Dimensionals – 144108
Stampin’ Dimensionals – 104430
Tear & Tape Adhesive – 138995
Directions:
1. Powder Pink Cardstock – cut 1 – 3 1/2″ x 5 1/2″ and add texture with Petal Pair T.I.E.F. Wrap gingham ribbon around cardstock and secure using baker’s twine.
2. Basic Gray Cardstock – cut 1 – 4 1/4″ X 11″ and score at 5 1/2″. Fold to create card base. Cut 1 – 4 1/4″ X 1″ and cut scalloped trim using Petals & More Thinlits. Adhere to Powder Pink cardstock using Tear & Tape Adhesive. Secure Power Pink piece using Stampin’ Dimensionals.
3. Whisper White Cardstock – cut 1 – 3 1/2″ X 2 1/2″. Using the Stitched Shapes Framelits cut out the largest oval then stamp your sentiment. Cut 1 – 3″ X 3″ and stamp Petal Palette rose image with Basic Gray ink , then cut out image using the coordinating thinlit. Color the image using your Aqua Painter and ink pads. Attach with Stampin’ Dimensionals.
If you need to purchase any of these products, please visit my online store @
www.kimberlymyers.stampinup.net . Don’t miss out on purchasing this versatile stamp set, it’s only available until May 31st. Sale-A-Bration will be ending soon, so be sure to place your order by March 31st to receive a FREE gift from Stampin’ Up! for every $50 you purchase.
Thanks for stopping by! Be sure to check back soon to see my next card tutorial which will feature Waterfront, another must-have from the Occasions Catalog.
Happy Stampin’ and blessings!
Kimberly Myers
